| HOME | BOOK STORE | FREE LAB | ONLINE | CONTACT US |

You Can If You Think You Can > " โจดอยทำได้คุณก็ต้องทำได้ " นายเกรียงศักดิ์ นามโคตร (อาจารย์ดอย) ผู้ก่อตั้ง บริษัทโจดอย ไอทีแอนด์เซอร์วิส จำกัด ปัจจุบันดำรงตำแหน่งกรรมการผู้จัดการบริษัทโจดอย ไอทีแอนด์เซอร์วิส จำกัดและเป็นวิทยากรบรรยายพิเศษให้กับหน่วยงานทั้งภาครัฐและเอกชน Certifications : -------------------------------------------------------------------- Basic Network Command by Mr.Jodoi มาเรียนรู้การใช้ Network Command เบื้องต้นกันนะครับ ขอแนะนำ command ping และ command traceroute จากวีดีโอที่อาจารย์เกรียงศักดิ์ นามโคตร (อาจารย์ดอย) ทำไว้ใน youtube ครับ
มาเรียนรู้การคำนวณ IP Address version 4 ด้วยเทคนิคการใช้ตารางมหัศจรรย์ซึ่งทำให้ศิษย์นำไปใช้ในการทำงานและการสอบ Cert.IT ได้อย่างดีเยี่ยม
Basic Linux Command ตอนที่ 1 (ls,cat,vi)by Jodoi มาเรียนรู้การใช้ Linux Command เบื้องต้นกันครับ เริ่มต้นด้วย command ls , cat และ vi ซึ่งปัจจุบันมีความจำเป็นต้องเรียนรู่อย่างยิ่งเพราะหลายๆองค์กรมีการใช้ Linux Server กันมากขึ้น
และยังมีวีดีโอดีๆอีกมากมายรับชมได้ใน แชลแนล Mr.Jodoi ตามด้านล่างนะครับ https://www.youtube.com/user/MrJodoi
|
เรียนรู้การ Config OSPF บน Router CISCO กันครับ |
|||||||||||||||||||||||||||||||||||
ควรอ่านบทความ Routing Protocol เพื่อเป็นพื้นฐานก่อนได้ที่ https://www.jodoi.org/router%20protocal.html
จากรูปภาพด้านบนมีการออกแบบให้มีการใช้ Routing Protocol เป็น OSPF โดยแบ่งเป็น 3 Area คือ Area 0 , Area 1 และ Area 2 ก่อนที่จะประกาศ Routing ไม่ว่าจะเป็น Routing Protocol ประเภทใดสิ่งที่ต้องทำก่อนคือการต่อสายเชื่อมต่อและ Set IP Address ให้ถูกต้องก่อนครับ ดังตัวอย่างด้านล่างการ Set IP Address ของ Router R1, R2 , ABR2 และ SW-L3 R2(config)#interface f0/0
R1(config)#interface s0/0
ABR2(config)#interface g0/0 ABR2(config)#interface g0/1 ABR2(config)#interface loopback 0 SW-L3(config)#interface g0/0 SW-L3(config)#vlan 20 SW-L3(config)#interface vlan 20 SW-L3(config)#interface loopback 0
ขั้นตอนต่อไปคือการประกาศ Routing ospf ซึ่งสามารถ Config ได้ 2 แบบคือการใส่ Area ที่ในส่วนของ Routing และการใส่ Area ที่ตรงส่วนของ Interface Router R2 และ Router ABR2 มีการ Config แบบใส่ Area ตรงส่วนของ Routing รูปแบบ Config ตามด้านล่าง ในรูปแบบนี้ต้องศึกษาเรื่องของ Network IP และค่า Wildcard Mask ต้องใส่ค่าให้ถูกต้องโดยต้องมีค่าตรงกันกับ Router ฝั่งตรงข้าม R2(config)#router ospf 2 ABR2(config)#router ospf 1
Router R1 และ SW-L3 มีการ Config แบบใส่เลข Process-ID และ Area ไว้ที่ Interface รูปแบบ Config ตามด้านล่าง R1(config)#router ospf 4 SW-L3(config)#ip routing SW-L3(config)#interface g0/0 ตรวจสอบ Routing Table ของ SW-L3 จะได้ตามด้านล่าง
ตรวจสอบ Routing Table ของ Router ABR2 จะได้ตามด้านล่าง
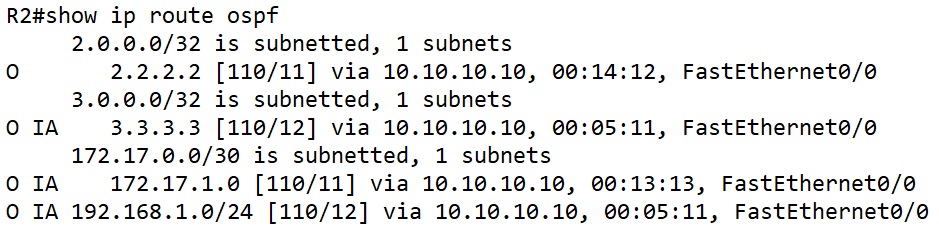
ตรวจสอบ Routing Table ของ Router R2 จะได้ตามด้านล่าง
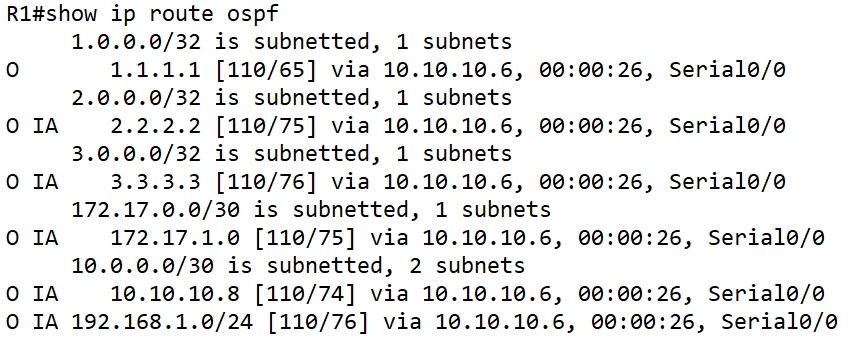
ตรวจสอบ Routing Table ของ Router R1 จะได้ตามด้านล่าง
ดูตัวอย่างวีดีโอ OSPF Interface และ Network type ได้ตามด้านล่าง
ดูวีดีโอเพิ่มเติมเกี่ยวกับ OSPF ได้ ที่ Playlist ด้านล่าง https://www.youtube.com/watch?v=7JM52rYkU2w&list=PLxTcKTJPFY7NganNB0R3PpvfbbtHQJ5JO หวังว่าบทความนี้คงจะก่อให้เกิดประโยชน์ไม่มากก็น้อยสำหรับผู้ที่ทำงานอยู่ในแวดวงไอทีนะครับ ขอบคุณครับ
บทความ Network บทความ Linux บทความ Certificate
|