| HOME | BOOK STORE | FREE LAB | ONLINE | CONTACT US |

You Can If You Think You Can > " โจดอยทำได้คุณก็ต้องทำได้ " นายเกรียงศักดิ์ นามโคตร (อาจารย์ดอย) ผู้ก่อตั้ง บริษัทโจดอย ไอทีแอนด์เซอร์วิส จำกัด ปัจจุบันดำรงตำแหน่งกรรมการผู้จัดการบริษัทโจดอย ไอทีแอนด์เซอร์วิส จำกัดและเป็นวิทยากรบรรยายพิเศษให้กับหน่วยงานทั้งภาครัฐและเอกชน Certifications : -------------------------------------------------------------------- Basic Network Command by Mr.Jodoi มาเรียนรู้การใช้ Network Command เบื้องต้นกันนะครับ ขอแนะนำ command ping และ command traceroute จากวีดีโอที่อาจารย์เกรียงศักดิ์ นามโคตร (อาจารย์ดอย) ทำไว้ใน youtube ครับ
มาเรียนรู้การคำนวณ IP Address version 4 ด้วยเทคนิคการใช้ตารางมหัศจรรย์ซึ่งทำให้ศิษย์นำไปใช้ในการทำงานและการสอบ Cert.IT ได้อย่างดีเยี่ยม
Basic Linux Command ตอนที่ 1 (ls,cat,vi)by Jodoi มาเรียนรู้การใช้ Linux Command เบื้องต้นกันครับ เริ่มต้นด้วย command ls , cat และ vi ซึ่งปัจจุบันมีความจำเป็นต้องเรียนรู่อย่างยิ่งเพราะหลายๆองค์กรมีการใช้ Linux Server กันมากขึ้น
และยังมีวีดีโอดีๆอีกมากมายรับชมได้ใน แชลแนล Mr.Jodoi ตามด้านล่างนะครับ https://www.youtube.com/user/MrJodoi
|
เรียนรู้การ Config VLAN บน Switch CISCO กันครับ |
|||||||||||||||||||||||||||||||||||
ก่อนเริ่ม config VLAN ควรศึกษาเรื่องของ LAN และ VLAN เบื้องต้นที่บทความ https://www.jodoi.org/lan.html ก่อนนะครับ
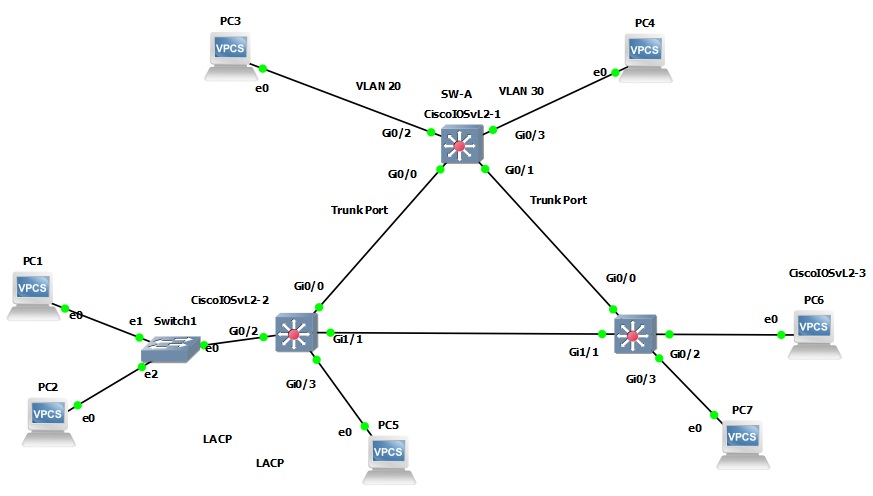
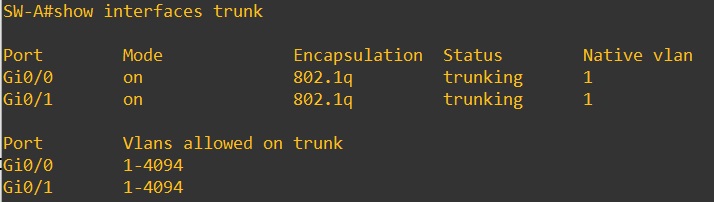
ตามรูปภาพด้านบน Switch ตัวบนคือ Switch A มี Interface G0/0 และ G0/1 เป็น Trunk Port , Interface G0/2 ถูกกำหนดให้อยู่ใน VLAN 20 , Interface G0/3 ถูกกำหนดให้อยู่ใน VLAN 30 มาดูขั้นตอนการ Config กันครับ การ Config VLAN บน Switch CISCO นั้นมีขั้นตอนดังนี้ 1. การ Config Trunk Port SW-A(config)#interface range g0/0-1 ตรวจสอบผลด้วย command #show interface trunk จะได้ดังภาพด้านล่าง
2. สร้าง VLAN SW-A(config)#vlan 20 3. การ Config Access Port SW-A(config)#interface g0/2 SW-A(config-if)#interface g0/3
ตรวจสอบผลด้วย command #show vlan brief จะได้ผลตามภาพด้านล่าง
เราสามารถควบคุมหรือเพิ่มความปลอดภัย โดยกำหนด VLAN ที่สามารถผ่าน Trunk Port ได้ด้วยการ allowed vlan แต่ควรศึกษาการใช้ให้ดีนะครับ เช่นถ้าต้องการให้ VLAN 40 และ VLAN 50 ผ่าน Trunk Port ได้เท่านั้นจะ config ตามด้านล่าง SW-A(config)#interface g0/0 และกรณีที่ต้องการเพิ่ม VLAN 30 ให้ผ่าน Trunk Port ได้ ให้ใช้ allowed vlan add 30 ดังด้านล่าง SW-A(config)#interface g0/0 กรณีที้ต้องการห้าม VLAN 50 ผ่าน Trunk Port ให้ใช้ allowed vlan remove 50 ดังด้านล่าง SW-A(config)#interface g0/0 แต่ถ้าไม่มีความชำนาญ ห้ามใช้ command allowed vlan นะครับเพราะทุก VLAN สามารถผ่าน Trunk Port ได้อยู่แล้ว -------------------------------------------------------------------------------------------- ข้อแนะนำเพิ่มเติม command ที่ใช้ในการตรวจสอบ config ของ Port หรือ Interface ของ Switch CISCO ครับ
วีดีโอตัวอย่างวิธีการทำ VLAN บน Switch CISCO
ดูวีดีโอเพิ่มเติมเกี่ยวกับ Switch CISCO ได้ ที่ Playlist ด้านล่าง https://www.youtube.com/watch?v=EZNUtzdj0A8&list=PLxTcKTJPFY7MNy_Vi5DqmDIZ7wgCft6SY หวังว่าบทความนี้คงจะก่อให้เกิดประโยชน์ไม่มากก็น้อยสำหรับผู้ที่ทำงานอยู่ในแวดวงไอทีนะครับ
ขอบคุณครับ
------------------------------------------------------------------------------------------------------- บทความ Network บทความ Linux บทความ Certificate
|